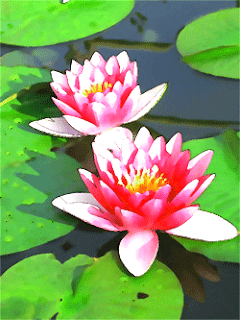
In this tutorial we will make a photo into a work of watercolor.
Later you can apply this technique for photos / other images. Follow the steps below:
1. Open the photo file has been downloa
ded or you can use phot
os you have. Do I select the menu File> Open or double-click on an empty area.
2. Here we will need two layers where the layer will only b
e the color of watercolor and the other layer will
be a sketch of the picture. Therefore, duplicate the Background layer by selecting Layer> Duplicate Layer and name the new layer with the name of the sketch.
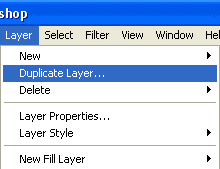
3. In the third step we are going to make one layer on top of a water color paint. In the Photoshop Watercolor filter that we know the effect to make the work of watercolor. In this tutorial we will not use the Watercolor filter but uses a different way. Why? because the
Watercolor filter will produce works that are less experienced watercolor in which the image becomes too dark and the strokes of the brush becomes visible no
t alami.Lakukan following steps: Activate the Background layer by clicking on the layer Background.Sembunyikan sketch layer by clicking eye icon to the left of the layer.
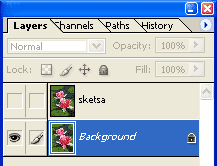
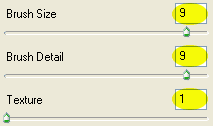
Run Filter> Artistic> Dry Brush to Dry Brush dialog box appears. Try to set the Brush Size, Brush Detail and Texture to produce work to your liking (here I am trying to use 9, 9, and 1). Then click Ok.
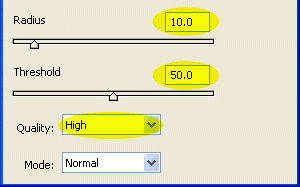
To soften and give the impression of a natural brush strokes, run Filter> Blur> Smart Blur dialog box will display the Smart Blur. Try setting the Radius range between 10 and threshold ranges from 50. Before selecting Ok, do not f
orget to set the Quality to High and Mode to Normal.
At this point, we have created a water color paint that looks natural.
4. Next we will work with the sketch layer. Follow the steps below: Click on the sketch layer to make it aktif.Jalankan Image> Adjustments> Desaturate to discard color gambar.Jalankan Filter> Blur> Smart Blur and set the Quality to High and Mode to Edge Only.
5. In this step, we will combine the two layers. In the Layer palette, click the pop-up menu and select Multiply. Leave the Opacity at 100%.
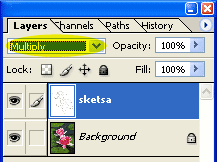
6. In this last step we will make arrangements warna.Untuk brighten the image you can use the adjustment layer so that someday you can do a reset. Start the Layer> New Adjustment Layer> Levels to show both the New Layer dialog box. Select Ok to display the Levels dialog box. Set the Input Levels to 0, 1, and 150 and then select Ok.Sekarang we will give a different color in the picture. Start the Layer> New Adjustment Layer> Hue / Saturation and set the color to your liking.
7. Done.
0 Comment